
 |
| Nope, this is not Blender OSL Texture, this is a photograph of an interesting glass pattern in my house. Not yet OSL, but eventually I am sure I can turn this into procedural OSL texture. |
So far, in previous posts, we have kind of touching some of the basics of Procedural OSL Textures:
- Few different ways to create LINE
- Creating procedural Wavy Lines
- Creating procedural Circle
- Creating procedural Star
- Creating procedural Ring
- Repeating in grid pattern
- Creating Brick pattern
- Adding and multiplying textures inside OSL
We use all sort of "clever maths" to generate textures. Slowly, we also started to be able to "transform" the procedural texture: Translate (usually by offset value), Scale (usually by multiplying) and Rotate, which often involves PI.
I, personally, am still questioning whether OSL is really artist friendly, just like how programming language like Python or Processing is really artist friendly.
In case of OSL (or RSL, etc), maybe artists do not always need to get too deep with the math and functions, and instead focusing on Layering and Mixing pre-made nodes using OSL, just like how they might do it using node network.
Shading Language is pretty big and abstract area, just like how Morgan Freeman trying to explain the Black Hole, no matter how convincing he tries to explain about that topic with his God-ly voice, it still does not make sense to many people in general.
However, I think this OSL is an interesting area, it makes an artist look into the complexity of math and appreciate how it can create a beautiful simple visual. There are certainly a lot of things to discover along the way.
Really thinking about Shader Writing in CG pushes one to look into everyday thing with different perspective, breaking complexity into simple shapes and mixing it back. This is especially great for Texture Artist and CG artist in general.
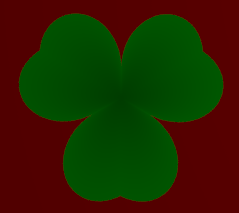
Anyways, enough babbling, lets take a look at something pretty: Clover.
OSL Flower and OSL Clover
I was fortunate to stumble into this thread about OSL Flower:http://blenderartists.org/forum/showthread.php?277334-Flowers-OSL
That OSL Flower by Meta-Androcto is quite interesting to study. The thread mentioned about OSL Clover by sungreen which leads me into this Blender Forum in Russian:
http://blender-3d.ru/forum/index.php?topic=421.0
Which then landed me into this great resources by Iñigo Quílez, who is apparently a TD at Pixar:
http://www.youtube.com/user/mari1234mari/videos
http://www.iquilezles.org/www/index.htm
Comparing the video of Clover code by Iñigo Quílez with OSL Clover by sungreen and OSL Flower by Meta-Androcto, I think we can start understanding what is happening to create Clover code.
I like a lot how Iñigo writes the Clover code lines by lines and see the result:
http://www.youtube.com/watch?v=-z8zLVFCJv4
The post by sungreen at Russian Blender Forum regarding Clover code is also very helpful and clear in explaining how he explained the translation from Quílez code into his OSL Clover code. I advice you to read that post above first.
Thanks to Iñigo for the clever Clover function!
Lets try to write the OSL step by step....
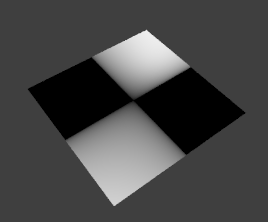
001. Checkered Pattern?
shader clover(
color ColorBase = color(1,0,0),
color ColorA = color(0,1,0),
vector Vec = P,
output color ColOut = color(0.2)
)
{
vector p = Vec;
float r = sqrt(dot(p[1], p[0]));
float f = r;
ColOut = f;
}
002. Another Dot, but blurry
shader clover(
color ColorBase = color(1,0,0),
color ColorA = color(0,1,0),
vector Vec = P,
output color ColOut = color(0.2)
)
{
vector p = Vec;
float r = sqrt(dot(p, p));
float f = r;
ColOut = f;
}
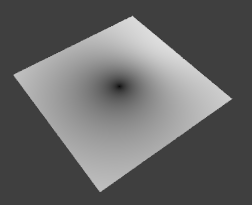
r = sqrt(dot(p, p));
"Drawing a Circle in Polar Coordinate;
r will be the distance of every pixel to the center of the screen." - Iñigo
r will be the distance of every pixel to the center of the screen." - Iñigo
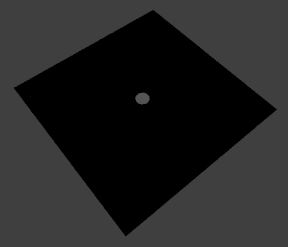
003. Conditional function that does sharp edge.
shader clover(
color ColorBase = color(1,0,0),
color ColorA = color(0,1,0),
vector Vec = P,
output color ColOut = color(0.2)
)
{
vector p = Vec;
float r = sqrt(dot(p, p));
float f = 0.0;
if(r<0.5) f = 1.0;
ColOut = f;
}
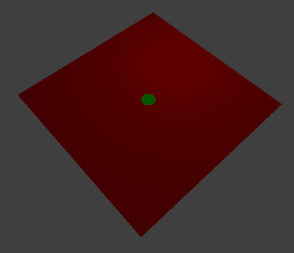
004. Using the force to mix 2 colors.
shader clover(
color ColorBase = color(1,0,0),
color ColorA = color(0,1,0),
vector Vec = P,
output color ColOut = color(0.2)
)
{
vector p = Vec;
float r = sqrt(dot(p, p));
float f = 0.0;
if(r<0.5) f = 1.0;
ColOut = mix(ColorBase, ColorA, f);
}
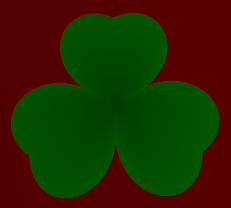
005. Adding special function that seems to create and adjust number of Petals.
shader clover(
color ColorBase = color(1,0,0),
color ColorA = color(0,1,0),
vector Vec = P,
int Petal = 3,
output color ColOut = color(0.2)
)
{
vector p = Vec;
float r = sqrt(dot(p, p));
float a = atan2(p[1], p[0]);
float s = 0.5 + 0.5 * sin(Petal * a);
float t = 0.4 + 0.3 * s;
float f = 0.0;
if(r<t) f = 1.0;
ColOut = mix(ColorBase, ColorA, f);
}

By adjusting that variable named "Petal" we can have any number of petals we wish.
a = atan2(p[1], p[0])
"a will be arc tangent of the Y divided by X of that pixel" - Iñigo
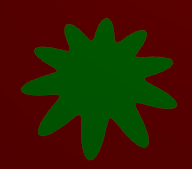
It is a bit like the OSL Star, but rounded. What would be nice is to have control over the curve shape, which should be investigated later.
We do have few values that can be converted into variables, so I will do exactly that.
shader clover(
color ColorBase = color(1,0,0),
color ColorA = color(0,1,0),
float s1 = 0.5,
float s2 = 0.5,
float t1 = 0.4,
float t2 = 0.3,
vector Vec = P,
int Petal = 3,
output color ColOut = color(0.2)
)
{
vector p = Vec;
float r = sqrt(dot(p, p));
float a = atan2(p[1], p[0]);
float s = s1 + s2 * sin(Petal * a);
float t = t1 + t2 * s;
float f = 0.0;
if(r<t) f = 1.0;
ColOut = mix(ColorBase, ColorA, f);
}
You may or maynot want to setup the variables like above, but I do that so that we can see the effect of what is happening when we adjust the values. We could always revert the value to the default.

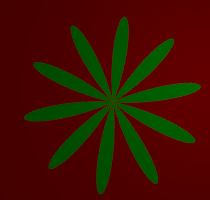
Moving on, I will reset the value and add the further modification, following the video that is shown by Inigo.
shader clover(
color ColorBase = color(1,0,0),
color ColorA = color(0,1,0),
float s1 = 0.5,
float s2 = 0.5,
float t1 = 0.4,
float t2 = 0.3,
vector Vec = P,
int Petal = 3,
output color ColOut = color(0.2)
)
{
vector p = Vec;
float r = sqrt(dot(p, p));
float a = atan2(p[1], p[0]);
float s = s1 + s2 * sin(Petal * a);
float t = t1 + t2 * pow(s,0.3);
float f = 0.0;
if(r<t) f = 1.0;
ColOut = mix(ColorBase, ColorA, f);
}

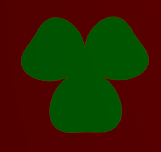
006. Adding special function that creates dent in the petal to create Clover.
shader clover(
color ColorBase = color(1,0,0),
color ColorA = color(0,1,0),
float s1 = 0.5,
float s2 = 0.5,
float t1 = 0.4,
float t2 = 0.3,
vector Vec = P,
int Petal = 3,
output color ColOut = color(0.2)
)
{
vector p = Vec;
float r = sqrt(dot(p, p));
float a = atan2(p[1], p[0]);
float s = s1 + s2 * sin(Petal * a);
float t = t1 + t2 * pow(s,0.3);
t += 0.04 * cos(6.0*a);
float f = 0.0;
if(r<t) f = 1.0;
ColOut = mix(ColorBase, ColorA, f);
}
shader clover(
color ColorBase = color(1,0,0),
color ColorA = color(0,1,0),
float s1 = 0.5,
float s2 = 0.5,
float t1 = 0.15,
float t2 = 0.35,
vector Vec = P,
int Petal = 3,
output color ColOut = color(0.2)
)
{
vector p = Vec;
float r = sqrt(dot(p, p));
float a = atan2(p[1], p[0]);
float s = s1 + s2 * sin(Petal * a);
float t = t1 + t2 * pow(s,0.3);
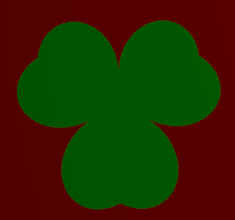
t += 0.1 * pow(0.5 + 0.5*cos(6.0*a), 0.5);
float f = 0.0;
if(r<t) f = 1.0;
ColOut = mix(ColorBase, ColorA, f);
}
007. Added function that creates some kind of gradient inside the petal.
shader clover(
color ColorBase = color(1,0,0),
color ColorA = color(0,1,0),
float s1 = 0.5,
float s2 = 0.5,
float t1 = 0.15,
float t2 = 0.35,
vector Vec = P,
int Petal = 3,
output color ColOut = color(0.2)
)
{
vector p = Vec;
float r = sqrt(dot(p, p));
float a = atan2(p[1], p[0]);
float s = s1 + s2 * sin(Petal * a);
float t = t1 + t2 * pow(s,0.3);
t += 0.1 * pow(0.5 + 0.5*cos(6.0*a), 0.5);
float h = r/t;
float f = 0.0;
if(r<t) f = 1.0;
ColOut = mix(ColorBase, (0.5+0.5*h) * ColorA, f);
}
008. Adding additional function to control ROTATION.
shader clover(
color ColorBase = color(1,0,0),
color ColorA = color(0,1,0),
float s1 = 0.5,
float s2 = 0.5,
float t1 = 0.15,
float t2 = 0.35,
vector Vec = P,
int Petal = 3,
float Rotation = 0.0,
output color ColOut = color(0.2)
)
{
vector p = Vec;
float r = sqrt(dot(p, p));
float a = atan2(p[1], p[0]) + Rotation / 6.0;
float s = s1 + s2 * sin(Petal * a);
float t = t1 + t2 * pow(s,0.3);
t += 0.1 * pow(0.5 + 0.5*cos(6.0*a), 0.5);
float h = r/t;
float f = 0.0;
if(r<t) f = 1.0;
ColOut = mix(ColorBase, (0.5+0.5*h) * ColorA, f);
}
009. Adding additional function to control SCALE.
I am not quite sure with this one, but I try adding snippet of value and it seems to control the size of the clover/flower petals.
shader clover(
color ColorBase = color(1,0,0),
color ColorA = color(0,1,0),
float s1 = 0.5,
float s2 = 0.5,
float t1 = 0.15,
float t2 = 0.35,
float Scale = 0.5,
vector Vec = P,
int Petal = 3,
float Rotation = 0.0,
output color ColOut = color(0.2)
)
{
vector p = Vec;
float r = sqrt(dot(p/Scale, p/Scale));
float a = atan2(p[1], p[0]) + Rotation / 6.0;
float s = s1 + s2 * sin(Petal * a);
float t = t1 + t2 * pow(s,0.3);
t += 0.1 * pow(0.5 + 0.5*cos(6.0*a), 0.5);
float h = r/t;
float f = 0.0;
if(r<t) f = 1.0;
ColOut = mix(ColorBase, color(0.5*h, 0.4+0.5*h, 0.0) * ColorA, f);
}
010. Further refinement.... From this step and on I will follow sungreens OSL Clover step by step.
(MORE SOON)
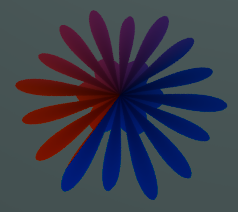
RANDOM MODIFICATION
shader clover(color ColorBase = color(1,0,0),
color ColorA = color(0,1,0),
color ColorB = color(0,0,1),
float s1 = 0.5,
float s2 = 0.5,
float t1 = 0.15,
float t2 = 0.35,
vector Vec = P,
int Petal = 3,
float Rotation = 0.0,
output color ColOut = color(0.2)
)
{
vector p = Vec;
float r = sqrt(dot(p, p));
float a = atan2(p[1], p[0]) + Rotation / 6.0;
float s = s1 + s2 * sin(Petal * a);
float t = t1 + t2 * pow(s,0.3);
t += 0.1 * pow(0.5 + 0.5*cos(6.0*a), 0.5);
float h = r/t;
float f = 0.0;
if(r<t) f = 1.0;
ColOut = mix(ColorBase, (0.1+0.9*h)*mix(ColorA, ColorB, a), f);
}
shader clover(
color ColorBase = color(1,0,0),
color ColorA = color(0,1,0),
color ColorB = color(0,0,1),
float s1 = 0.5,
float s2 = 0.5,
float t1 = 0.15,
float t2 = 0.35,
vector Vec = P,
int Petal = 3,
float Rotation = 0.0,
output color ColOut = color(0.2)
)
{
vector p = Vec;
float r = sqrt(dot(p, p));
float a = atan2(p[1], p[0]) + Rotation / 6.0;
float s = s1 + s2 * sin(Petal * a);
float t = t1 + t2 * pow(s,0.3);
t += 0.1 * pow(0.2 + 0.3*cos(20.0*a), 0.5);
float h = r/t;
float f = 0.0;
if(r<t) f = 1.0;
ColOut = mix(ColorBase, (0.1+0.9*h)*mix(ColorA, ColorB, s*t), f);
}
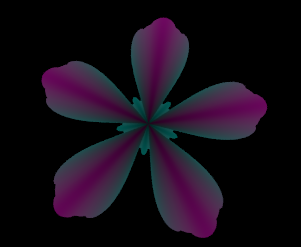
I guess neverending variations could be created from here depending on how much parameters you allow in the node.
ADVANCED CLOVER OSL
From the above "basic clover", these 2 guys (Meta-Androcto and sungreen) really took the Clover function from Iñigo to the next level.http://blender-3d.ru/forum/index.php?topic=421.0
 |
| I was actually impressed with this OSL Clover Shader. It is very simple and efficient, but gives detailed and interesting texture result that would normally not easy to achieve procedurally. |
I think its a good idea to attempt to break down and reconstruct that advanced Clover OSL. It displays some interesting OSL features:
- Separating Color texture into its own internal functions
- Alpha
- Mask
- Idea of randomizing Texture color within the OSL
- Layering
I am studying this now.....
(TO BE CONTINUED...)
MORE OSL GOODNESS
http://elbrujodelatribu.blogspot.com/2013/04/blender-cycles-osl-voronoi-tiles.htmlhttp://renatogsousa.weebly.com/osl.html


0 komentar:
Posting Komentar